The Playpoi Guide to Fire and LED Photography
Want to take better fire and LED photos?
You don’t need an expensive camera to take great LED or fire photos. You do need a camera that gives you manual control of shutter speed, aperture, and ISO, and some basic understanding of lighting, photo composition, and posing.

Fortunately, most cameras now offer manual controls, and there are advanced camera apps for smartphones. As for camera settings and photo theory, you can learn that in a week with the help of this article and your own experimentation.
What makes a good photo is subjective. For the purposes of this article I’m assuming the following goals:
- The photo has the desired balance of dark and light
- The fire or LEDs have the desired amount of trails and detail
- The peformer is captured as desired
- The scene is captured as desired
- The overall composition has a desired effect
Desired by who? By you!
Myself I often like photos where the performer is clearly captured, but I also often like photos where the performer is a mysterious shadow behind the pattern. This article is about the technical skills and philosophy of such choices.
Don’t expect to understand everything perfectly upon the first read. Read it once, experiment with your own photos, and then read it again. A little experience goes a long way.
We’ll discuss the following subjects. I’ve stacked them in the order that makes most sense for people new to photography.
- Photographic “stops”
- The Basics of Shooting: Sensor, Aperture, ISO, and Depth of Field
- Buyers Guide for Cameras
- Buyers Guide for Lenses
- More on Lenses: Focal Length and Field-of-View
- Other Equipment
- The Art and Science of Exposure
- How to Use Camera Settings Skillfully
- The Art of Composition
- Performing for the Camera
- Photo Editing Software
- Conclusion
PHOTOGRAPHIC “STOPS”
Photographers often talk about “stops,” as in, “Increase the ISO by two stops.”
A stop simply means half or double the brightness. If you go up one stop, that means doubling the brightness. Going down one stop halves the brightness.
I won’t talk about stops extensively in this article, but you will definitely encounter stops if you go further with photography research.

THE BASICS OF SHOOTING: SENSOR, SHUTTER SPEED, APERTURE, ISO, AND DEPTH OF FIELD
The Sensor is a rectangle of material inside the camera that light hits after passing through the lens. The sensor turns light into electric signals, which the camera processes to create an image.

Shutter Speed is how long the shutter stays open to let light hit the sensor. Some cameras use an electronic shutter, which means the camera just turns the sensor on and off quickly, with no moving parts.
Doubling or halfing the shutter speed is equal to one stop of brightness.
The Aperture is the width of the “pupil” of the lens that the light passes through to get to the sensor. For most lenses, the aperture can get bigger or smaller.
The aperture number is a ratio between the focal-length of the lens and the diameter of the pupil. It is expressed as an f followed by a number, f/2.8, f/4.0, etc. Smaller aperture numbers mean bigger apertures, and bigger aperture numbers mean smaller apertures.
Multiplying or dividing the aperture number by 1.4 is one stop. F/2.0 lets in twice the light of f/2.8, which lets in twice the light of f/4, which lets in twice the light of f/5.6. Thus f/2.0 is eight times brighter than f/5.6.
Smartphones have fixed-apertures. To make up for this, they allow the ISO to go much lower than cameras with variable aperture.

ISO is how much the camera boosts the signal from the sensor, which determines how bright or dark the image appears. The higher the ISO, the brighter the resulting image. Raising the ISO also boosts any “noise” (grain or artifacts) in the image.
Noise is caused by electromagnetic static within the sensor and electronics of the camera. With brightly lit scenes, there is a high signal-to-noise ratio, so you don’t see the noise. When you boost the ISO during low-light shooting, you boost the noise along with the signal.
Trivia: People argue about whether or not ISO is an acronym. Some poeple will tell you that it stands for International Standards Organization, and they pronounce it Eye-Ess-Oh. Other people claim it’s an invented word based on the Greek word isos, which means “equal.” They pronounce it like the begininng of the word “isolate.” I believe the latter is true.
Doubling or halving the ISO doubles or halfs the brightness, and is thus equal to one stop of brightness.
Depth of Field refers to how much of the photo is in focus in front and behind the subject (or more accurately, the plane-of-focus). A narrow depth of field means the subject is in focus while things closer and further are blurry. A wide depth of field means everything is in focus.
Until recently you could only get obvious narrow depth of field by shooting with a big-sensor camera with a big-aperture lens. A few smartphones are now offering fake narrow depth of field via dual-camera systems and processing power.
The blurry background effect is called “bokeh,” which is a Japanese word for blur. It’s pronounced “Bow-Ke,” like the bow from bow-tie and ke from kettle.

BUYERS GUIDE FOR CAMERAS
Sensor Size and Quality: Higher-end cameras typically have much bigger sensors than smartphones or compact cameras (although Sony and Canon have started selling compacts with bigger sensors). The biggest typical sensor size is full-frame (36mm wide), which was designed to use the same lenses used with 35mm film. In comparison, smartphone sensors are typically just 5mm wide, meaning they are roughly 1/40th the surface area of full-frame sensors.

If sensor qualities are equal, the bigger the sensor, the better it will shoot in low light. Bigger sensors also mean narrower depth of field at big apertures.
The leading smartphone companies are attempting to make up for small sensor sizes with processing power, and they have larger budgets for this than the camera companies. A large sensor camera still shoots better than any smartphone, but not by as large a margin as one might imagine.
Bigger sensors does not always mean more pixels. The Sony A7sII only has 12MP, but it is engineered to make those pixels very good at recording in low-light.
It can be helpful to google, “Camera X low-light” to learn about any given camera’s low light performance. Just be sure to read a few different reviews (suggested sources at the bottom).
Megapixels: A megapixel is a million pixels. 8MP is plenty for the internet, even if you crop the photo (most Facebook images are about 1200×800 pixels, which is about 1mp). 24MP is plenty if you want to make large prints.
Warning: More megapixels means bigger files, which means slower burst shooting speeds, shorter battery life, memory cards filling up quickly, and computer programs like Adobe Lightroom and Photoshop slowing to a crawl. I rue the day I bought a 42MP camera, and I can’t wait to go back to 24MP or less.
Autofocus Technologies: Each camera brand has their own evolving technologies to achieve autofocus. If you are researching cameras, try googling “Camera X autofocus low light” to see if you can dig up information.
Fixed or Changeable Lenses? One of your big decisions will be whether to buy a camera with a single fixed lens, or a camera that can take a variety of lenses. More on that below.
DSLR or Mirrorless? If you choose the route of interchangeable lenses, another big decision will be between DSLR and mirrorless systems. DSLR stands for Digital Single Lens Reflex, which means the camera has a mirror that flips up and down, which reflects the light up to the eyepiece, to allow you to look through the lens. A mirrorless camera takes the image direct from the sensor and displays it on the viewfinder or screen. I believe the industry will keep moving toward mirrorless.
BUYERS GUIDE FOR LENSES
Every lens has a maximum and minimum aperture. Because bigger apertures allow faster shutter speeds in low light, photographers often call lenses with big maximum apertures “fast lenses.” Others call them “bright lenses.”
Zoom-lenses allow you to zoom in and out. Sometimes cameras are listed as having a 3X, 5X, or 20X zoom. That is of limited use without knowing the actual minimum and maximum focal lengths. For example, once I know a lens has a zoom range of, say, 24mm-200mm, then I know better whether it meets my needs (more on focal lengths below). generally, lenses with big zoom ranges use lots of glass elements and compromise quality.
Zoom lenses often have a maximum aperture that gets smaller as you zoom in (number gets bigger.) For example, the lens may have a max aperture of f/2.8 when zoomed out, but max f/5.6 when zoomed in. Other zoom lenses offer a fixed maximum aperture across the range. They tend to be more expensive.
A prime lens is a fixed focal-length lens, meaning you can’t zoom in or out. Compared to zoom lenses, prime lenses have less glass elements and they usually offer better image quality, better low-light performance, and bigger maximum apertures, meaning better low-light performance and more control over depth-of-field.
Popular lenses tend to range in price between $300USD to $2500USD. There are many things that affect the cost of a lens, such as:
- Maximum aperture
- Fixed max aperture across a zoom range
- Image sharpness (especially edge-to-edge sharpness)
- Autofocus capabilities
- Optical Image Stabilization
- Power zoom
Before buying an expensive lens, consider which lens characteristics you truly need. For example, do you really need image sharpness at the edge of a dark photo?
If in doubt, start with the “kit lens” that is optionally bundled with the camera. It will be a reasonably decent lens with a standard zoom range. You can decide later whether to buy a higher quality zoom, or a prime lens to match your favourite focal length.
MORE ON LENSES: FOCAL LENGTH AND FIELD OF VIEW
This section is the toughest to understand. If you’re not planning on buying lenses anytime soon, you can probably skip this bit. Personally I find it fascinating!
Focal Length technically refers to the distance between the point of convergence of light and the sensor. You don’t need to fully understand that. If you’re curious you can read the wikipedia article.

The Field-of-View is the wedge of the visible world that the camera converts into an image. A wide filed-of-view captures a whole panorama and makes objects appear smaller and further away. A narrow field-of-view captures a narrow section of view, and makes objects appear bigger and closer.
The field of view is determined by the ratio between the focal length and the size of the sensor, not the focal length by itself. If the focal length and sensor are both halved, the field-of-view stays the same.

Here’s why things get confusing: Many years ago it became a photography convention to use only the focal length of lenses to describe their field-of-view. This was when almost all lenses were designed for 35mm film. A 50mm lens was neutral, 35mm was slightly wide, 18mm was very wide, 85mm was slightly narrow, 200mm was telephoto, etc. Nobody expected the size of film to change, so they didn’t see a problem with talking about fields-of-view indirectly.
When camera companies started producing different sensor sizes, the convention became less useful. A 35mm lens is wide-angle only when it’s on a full-frame camera. It is telescopic on a smartphone sized camera!
The camera industry could standardize the use of numerical field-of-view angles as a better convention (5° of view, 20° of view, etc.), but so far they haven’t. Some manufacturers will state the “effective” focal length of non-full-frame camera lenses rather than the actual focal length. E.g. The iPhone 7 has an actual focal length of 4.15mm, but it is listed as having a “29mm eff” focal length (which means it has a field-of-view similar to a 29mm lens on a full-frame camera). Other manufacturers will simply state the actual focal length, especially when they think it makes the lens sound better.
To know how wide or narrow a lens is in terms of full-frame equivalent focal length, you will need to know whether the manufacturer is doing the math for you. Any given sensor has a “crop factor.” This is the number that you need to multiply the focal length by to get the full-frame equivalent focal length. To get it, simply google, “Camera X crop factor.”
For instance, a Sony A6000 has an APS-c sized sensor, which has a crop factor of around 1.5. Thus a 24mm lens on the A6000 will give a field-of-view similar to a 35mm lens on a full-frame camera.
As an alternative to understanding all of this, you can simply pick a camera system and get used to the associated ecosystem of lenses. Just remember that a given focal length may be wider or narrower on other cameras, including the camera used in any photography videos you may watch online.
Easy fact: For full-frame cameras, a 50mm lens is considered a neutral viewing angle, as objects don’t appear closer or farther when you look through the lens. 35mm is a more popular focal length for consumer cameras, since a slighly wide-angle lens is better for landscapes.
OTHER EQUIPMENT
Tripod (or table, stool, top of garden-gnome, etc.): A tripod helps keep the camera still while the shutter is open. For long shutter speeds, this is very helpful. If you don’t have a tripod, you can put the camera on top of a table or any flat surface.
A tripod is the single most effective way to dramaticlaly improve your photos! You can buy aluminum tripods starting at $30. This article is pretty useless if you’re shooting handheld.
Remote Shutter: Using a remote to trigger the shutter is a further way to avoid camera shake. You can buy wired or wireless remotes for most cameras, and you can download remote shutter apps for some cameras. To check whether there is a physical remote or app for your camera, Google “Camera X remote shutter.”
Flashes and flash accessories: Flashes (also called “strobes”) can be very useful for capturing the performer, but using the flash mounted on the camera often creates a flat looking image.
The best solution is to use multiple flashes, set around the performer, controlled by a remote control attached to the camera. How to use multiple off-camera flashes is a complex issue.
I’ve had great success using 2 very affordable strobes and a controller from Godox, along with some cheap flash diffusers. I ordered it all from Amazon for less than $200. If you decide to get flashes, make sure that you’re ordering gear that is compatible with your camera. Also if you are ordering a camera, it’s worth considering whether you want a camera with a hot-shoe for adding flashes and flash controllers. When using a flash, most cameras will give you the option to choose a “second curtain” or “rear curtain” sync. That means the flash will trigger at the end of a long exposure, rather than the beginning. The result is that any motion blur will appear like the natural trail of the performer and props in motion.
THE ART AND SCIENCE OF EXPOSURE
Exposure refers to the brightness or darkness of the photo, or parts of it.
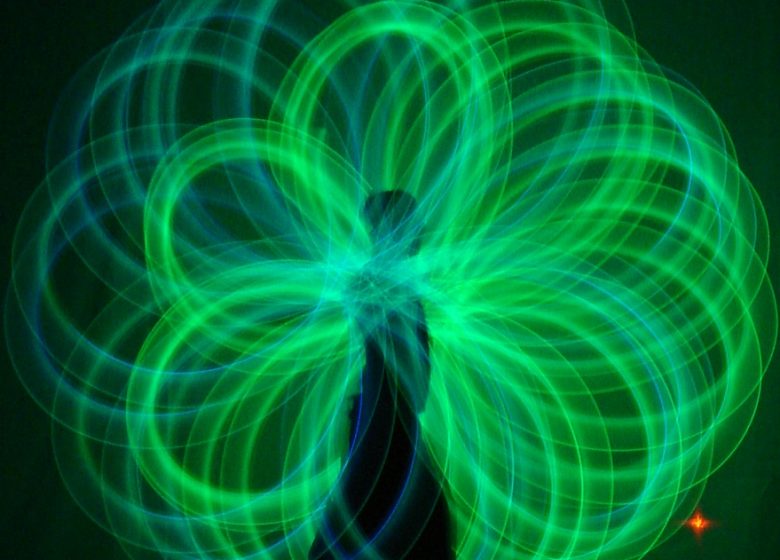
Overexposure (sometimes called blown-out or “clipped”) happens when the sensor receives too much light to capture detail accurately. Overexposed areas appear as pure white, or another bright solid color. This is often the case for photos of fire-spinning: there is no detail in the fire. Overexposure can also result in haloing and other weird distortions.
Underexposure means something is too dark, again to the point of lost information and compromised quality. There is no distinct underexposure cut-off point, rather it’s degrees of lost detail and competition with sensor noise.

Brightness and darkness can be adjusted with programs like Lightroom and Photoshop, but only if the details were successfully captured. If the image is truly over or underexposed, there is nothing for photoshop to work with; The information was not captured and thus software can’t help.
In addition, because of the way our eyes and brains work, areas of pure black can appear realistic in a photograph, but areas of pure white do not.
Because of these factors, photographers believe that overexposing brights is a bigger problem than underexposing darks.
The Exposure Triangle in regards to brightness:
The brightness or darkness of a photograph (or any part therein) involves a combination of three variables:
- Shutter speed: The length of time that light hits the sensor
- Aperture: The volume of light that passes through the lens
- ISO: How much the sensor boosts the signal
Let’s agree for now that a good exposure means a balance of light and dark, with no loss of detail to over or underexposure.
As the lighting of your subject and scene gets brighter, avoiding overexposure requires faster shutter speeds (less time for light to hit the sensor), and/or a smaller aperture (smaller opening for light to pass through), and/or lower ISO (less boosting of signal).
As lighting gets dimmer, avoiding underexposure requires longer shutter speeds, and/or a bigger aperture, and/or higher ISO.
This presents challenges, because shutter speed and aperture also dramatically effect other characteristics of the photo.
The Exposure Triangle in Regards to Capturing Motion and Detail:
The sensor will capture all activity of light while the shutter is open. It does not capture darks per se. A split second of light can replace dark, but no amount of dark can replace light once light has been recorded by the sensor.
If you want a crisp snapshot of a performer without using a flash, you will need faster shutter speeds. How fast depends on many factors. Typically, 1/50th of a second will capture sharp faces if the performer is posing, but moving hands and poi will be blurry. Capturing sharp hands and props requires shutter speeds of 1/200th-second or faster. At fast shutter speeds you will not get trails.

With fast shutter speeds, the image can easily appear too dark. To increase exposure you can either shoot with more ambient light, and/or use a wider aperture (smaller aperture number) and/or use a higher ISO. Unfortunately, a wide aperture and higher ISO can easily result in overexposing the LEDs or fire.
If you want fire or LED trails, you will need a longer shutter speed, typically 1/4 – 2 seconds, along with a smaller aperture (bigger number) and lower ISO to avoid overexposing the shot. Longer shutter speeds capture any movement of the performer as blur.

It’s difficult to capture trails with detail and a clear image of the performer in one shot. Solutions include getting the performers to pose skillfully for the camera, and using flashes to capture the performer with a quick burst of light. We’ll get to those further below.

USING CAMERA SETTINGS SKILLFULLY
Let’s review what you need to know:
Shutter speed: When you want to capture the performer as they move, shoot with fast shutter speeds. If you want to capture trails, set the shutter speed that will capture the desired amount of trails.
ISO: ISO usually starts at 100, and can go very high with some cameras. Photos typically get grainy when you need to use high ISOs. It’s not the ISO that creates the grain, but rather shooting with a fast shutter speed in low light. If you want to capture the detail of the fire and LEDs, stick between ISO 100-300. If you are willing to sacrifice the detail of the props to get a good snapshot of the performer, go higher. How high you can go and still get good results varies greatly between cameras. Most cameras can go to 1600 with acceptable results. Recent full-frame cameras can go to 6400 or even higher.
Aperture: As we’ve discussed, a smaller f/ number means a bigger aperture, and a larger f/ number means a smaller aperture.
When shooting snapshots of a performer in motion, you’ll often want the aperture open wider (smaller number) which let’s you use a faster shutter speed. When shooting with a wide aperture, you may need to use a surprisingly fast shutter speed to avoid overexposure.
When shooting trails, you’ll often need to narrow the aperture, to avoid overexposing any ambient light. A faint sunset can easily become overexposed if you set a 1-second shutter. To get detail with fire trails, I typically shoot with aperture f/4.5-f/6.3.
NOTE: For smartphones, you cannot adjust the aperture at all. Instead you have lower ranges for ISO. For fire try ISO 50, and adjust lower or higher from there.
For cameras with big sensors: The aperture is also important for deciding whether you want the background in focus. A bigger aperture (small f/ number, such as f/1.8) will result in a narrow depth of field, meaning a blurrier background, and a smaller aperture (big number, such as f/8) will result in a more focussed background. Google “camera lenses depth of field” to find lots of great articles.
BULB mode: Some cameras offer BULB mode, where the shutter remains open for as long as the shutter button is held down. If you’re trying to capture a 4-petal antispin, the camera operator can push the shutter button down when the poi is at a certain position, and release it when the poi gets back to that same position. Poof, you’ve captured a complete pattern with no overlap! This works the best when using a remote control to avoid the issue of camera shake.
Timed shutter (sometimes with multiple-exposures): Most cameras let you set a count-down of 2-10 seconds. Sometimes you can tell the camera to take multiple shots after the countdown. This is essential if you are taking photos of yourself, and a useful way to avoid camera-shake if you are the camera operator (the camera has stopped shaking by the time the shot is taken.)
Auto Focus, Manual Focus, and Focus Lock: Even professional cameras can have trouble autofocusing in the dark. For most cameras as of 2017, you will need a procedure.
If you’re shooting with other people, get somebody to stand at the model position. They can illuminate themselves with a flashlight or LED props. If you’re shooting photos of yourself, place an object where you plan to pose, and place your LED props or a flashlight near it for illumination. Then do one of the following:
A) Focus manually with the focus ring or dial on your camera. Many cameras automatically zoom in digitally to help you see details for focusing.
B) Autofocus by half-pressing the shutter button on your camera, or by tapping the screen on your phone. Then lock the focus! For smartphones, you usually press and hold the focus position until it locks. For cameras, simply switch to manual focus to lock. It’s good to re-check focus regularly.
If you are unsure how to lock focus on your device, just google, “Camera X lock focus.” Also remember that if the camera or model moves, you have to repeat the focus procedure. It’s helpful to mark the performer/model position on the ground.
Remember to set the camera back to your accustomed focus settings when you’re done shooting, otherwise you may fail to achieve focus on the killer whale the next day, when it crests right next to your boat, because you will be trying to autofocus in manual focus mode. Trust me, it happens.
Meter Modes: All of todays cameras measure the brightness of the scene, and use this information to execute any auto-features, with the goal of producing a shot with a balance of light and dark.
Cameras usually offer options regarding which parts of the scene are used to determine brightness. For instance, my Sony lets me choose “multi,” “center,” or “spot. Multi means the camera will consider the overall brightness of the entire scene. Center means the camera will give extra consideration to the center of the scene. Spot means the camera will only consider the center of the scene. Other camera brands will have their own variations of these options. I recommend using “multi” or the equivalent, because fire and LED photos invariably involve bright lights zipping around the scene, and thus center or spot meter modes will result in wildly fluctuating auto settings.
Aperture-Priority, Shutter-Priority, and Manual: Most cameras allow you to choose between these modes. Aperture-priority means you choose the aperture and the camera will choose the shutter speed. Shutter-priority means you choose the shutter-speed and the camera will choose the aperture. Manual mode means you choose both the shutter speed and the aperture. In all these modes you have the option to set a specific ISO, or to leave ISO on automatic.
File Quality and Resolution: Most cameras allow you to pick the resolution and quality of the images produced. Pick your preferred balance of image quality vs file size.
RAW file format: Some cameras allow you to shoot in RAW. This is a high-quality file format that preserves much more image information than a JPEG file type. RAW files allow you more freedom to edit the photo in programs like Lightrom and Photoshop. But we warned: RAW photos initially look flat and colourless! To create JPEGs, cameras automatically apply post-processing like boosted contrast and color saturation. RAW format leaves post-processing to you. RAW files are huge, and slow to open, and only certain software programs can read them. Only shoot in RAW if you want to (always) do post-processing.
Creative styles for JPEG images: Some cameras allow you to pick different image styles when shooting JPEGs, with names like “vivid,” “neutral,” “landscape,” “portrait,” and so on. These settings determine how the camera applies post-processing. Experiment to see which you like the most. If you are shooting RAW, the image style won’t apply. Some cameras (like mine) allow you to keep both JPEGs and RAW files for each shot, applying your chosen creative style to the JPEGs, but not to the RAW images.
THE ART OF COMPOSITION
Here’s my approach when I’m looking to take a fire or LED spinning photo:
1) I find something that would make a nice composition, even if there was nobody in it.
2) I ask myself, “Will it improve this composition to add a poi spinner?”
3) If the answer is that adding a poi spinner will destroy a perfectly nice photo of (say) a castle, I move on.
4) If the answer is something like, “This would be an even better composition if there were a poi spinner under that arch.” then we’re on to something!
5) I decide how to frame the composition and where to place the performer, taking into account any other strong composition elements. For instance, if there is a bright moon, I may compose the shot to have the moon in the upper left, and the poi spinner in the lower right.
4) I then work with the performer to try different patterns and poses. Typically I’ll only get a few photos I like from a shoot, and sometimes none. Most photographers agree that for every thousand photos, there are just a few keepers.

Pure Darkness:
I find it exceedingly difficult to get good shots of fire and LEDs spinning in pure darkness. The result is usually fire or LED patterns, with no scene and no performer!
I happen to love landscapes, and the human form, so I tend to shoot when there is ambient light, or when I can at least use flashes. But that’s just me. You may have ideas for shooting amazing photos in pure darkness. When you get some good shots, let me know because I’d love to see them!
Sunrise and Sunset:
The natural lighting of sunrise and sunset can create great lighting for LED and fire photos. It’s a challenging situation because the lighting changes quickly, especially in the tropics where the sun sets perpendicular to the horizon.
It’s very easy to overexpose a sunset or sunrise. Narrowing the aperture will reduce the brightness of the sky and also the LEDs or fire, which can lead to wimpy looking prop patterns. The only way to reduce the brightness of the sky compared to the props, is to use a shorter shutter speed. Yes, this will mean capturing shorter trails. There is no way around it, the sky needs to be dark enough to capture long trails.
When shooting at sunrise or sunset, I often shoot in aperture-priority, with ISO set to a specific number. The camera will change shutter speeds automatically as the light changes. I will switch to shutter-priority if I want to capture a certain amount of trails.
In the tropics, there are only 15 minutes where I get my preferred balance of the performer, the fire, and the background. The further north or south from the tropics you go, the longer the window of opportunity for optimal light.

Distance from Performer and Focal Length Regarding the Trails:
The distance of the camera from the performer affects the perceived distortion of the trails.
For example, with a wide-angle lens, things closer to the camera appear much bigger than things even slightly further away. If the performer has both poi on wheel planes, the trails of the poi closer to the camera will appear much bigger than the trails of the poi further from the camera.
You can solve this by backing away from the performer and using a narrower focal length, or by using digital zoom or cropping the photo later. Just note that the second two options impact image resolution.
A great example is taking a photo of a triquetra-meets-extesion (AKA a “Mercedes”). When I perform a Mercedes, I pass the triquetra-poi outside of the extension-poi at the top. My goal for the photo is usually to make the tips of the triquetra touch the extended-circle perfectly. Once, after taking several photos of this pattern, I felt frustrated because in the photos the top petal of the triquetra was extending up higher than the extension circle, even though I was sure I had been reaching higher with the extension. Eventually I realized that the issue was the camera position and angle. Because the triquetra poi was in front of the extension poi at the top, and thus closer to the camera, it was appearing to extend higher. By putting the camera a little further away, I solved the problem.

PERFORMING FOR THE CAMERA
The Technical Skill of Posing
If you want to capture the performer clearly without using flashes, the performer can try keeping their head and body as still as possible while moving only their arms. This will give you a performer-with-blurry-arms result.
You can also get the performer to freeze their arms in a certain position, either holding their props still (difficult with poi) or by moving them using their fingers only. This moment of frozen arms can be at the beginning, middle, or end of the pattern.
A word of caution: It’s very difficult to get people to not wiggle! It’s something that takes practice, just like poi spinning or photography.
All that said, photographs of blurred performers can look interesting. Keep experimenting. You will find what works for you!

Costumes, Make Up, and Artistic Posing
If you plan to capture a clear image of the performer, it’s worth considering cosmetic choices such as costumes, make-up, hair styling, jewelry, and so on. These choices can make a huge impact on the final image. (I personally think board-shorts and running shoes look pretty silly, but that’s just a matter of taste 😉
Just as important, and even harder to define, is how the performer poses. This includes body language, chin position, eyes, and facial expression.
I wish I knew better how to give advice on this. My best advice is to go for it, full power. Holding back because you’re afraid of being cheesy almost always looks boring. A bit of drama almost always makes a shot more interesting! Don’t “hide” from the camera. Claim your space!

Skill with the Props: Patterns and Lighting
How the performer moves the props will affect both the prop pattern captured in the image, and also the way the prop illuminates the performer.
If the prop passes close to the performer’s face, it will illuminate their face for that moment. If the prop passes their face twice, you may get a double-faced performer! If the performer keep the props behind them, they will be a silhouette. Any movement will be captured as blur. Stillness will be captured as clarity.
As a general rule of thumb, simple is better than complex. Pick a simple pattern and keep repeating it until you’ve got some shots. Most poi moves do not look good in photos. Most performers initially try to do too much, too quickly.
To summarize: One of the common challenges of posing for the camera is conveying movement, energy, and drama, while keeping your body still and doing simple things with the props!
PHOTO EDITING SOFTWARE
There’s no doubt, photo editing software can improve fire and LED photos.
I use Adobe Lightroom and Photoshop, which I get via the Adobe Creative Cloud Photography Plan. It’s 9.99USD/month and includes regular updates. There are various free photo editing programs, but I haven’t used any of them so I can’t recommend anything.
If you go with Adobe, I recommend learning both Lightroom and Photoshop. They are designed to be used together. Lightroom provides powerful tools for organizing your photos, and a simple, non-destructive, and powerful set of tools for adjusting photographs. Photoshop gives you invaluable tools for working with layers, selections, and masks (plus a million other tools). If in doubt, use Lightroom.
Photo-editing software lets you adjust things like exposure, contrast, and saturation, and it allows you to apply such adjustments only to specific parts of the photo. For example: Your photo may initially look like the fire is overexposed and the performer is underexposed. Photo-editing software lets you bring down the exposure of just the fire, and raise the exposure of just the performer.
It’s important to remember that photoshop can only work with the information that is actually captured. If the fire is too overexposed, the details of the fire were lost completely, and software can’t help. Good shooting and software work together.
There are lots of great resources for learning photo-editing software, and much of it is free (just look for “learn Photoshop/Lightroom” on Youtube).
For reference: I’m always honest, when asked, about how much I used photoshop for any image!

CONCLUSION
I hope this article helps you with your own photography journey. Remember to question everything I say. You will find your own style if you experiment!
If you enjoyed this article, please do share it with your friends and appropriate online forums. If you generally like what I do, check out and share the following win/win offerings that keep me moving:
-
- My Patreon Campaign, where I post details about how I shoot photos and videos. Patrons get early access to all my best content, along with other perks!
- Playpoi’s extensive collection of free videos (tell your friends!)
- My in-depth, step-by-step poi courses!
- Playpoi gear reviews. We have referral programs with Flowtoys, Home of Poi, and our other favourite shops. You support Playpoi while saving money, win/win!
- Poi events around the world (Costa Rica in March and April, and the Leviathan Poi Retreat in BC in June!)
- My Inktale shop where I sell prints of my best photos!
Thanks for reading, and please do share the article if you liked it! 🙂
Nick
RECOMMENDED CAMERAS
I can personally recommend the Sony A6000 and A6500 from my own experience. If you just want to shoot photos, the A6000 is very affordable. If you also want great video capabilities, go with the pricier A6500.
All the major camera brands produce quality cameras. I recommend getting any recent camera with an APS-c or Micro Four Thirds sized sensor. A 1″ sized sensor won’t do too bad either.
If you want just one lens, get a zoom lens with a standard range (24-70mm equivalent).
The Sony RX10 mark 3-5, and the Canon GX series are top quality compact cameras with relatively big sensors.
If you want to try off-camera flashes, Godox seems to offer the best combination of quality and affordability. Just make sure to get a camera with a flash hot-shoe!
RESOURCES
Below are some camera review sites that I’ve come to trust (I do not have referral programs with them):
DXOmark.com conducts technical reviews of cameras and lenses. They are trusted by professionals.
DPreview.com is another professional review site that the professionals look to.
————